
Command line tools#
The Toolbox ships with a number of command-line tools that provide convenient access to some of the functionality of the toolbox without needing to write a script.
All tools accept image file names as command-line arguments. These can be:
the name of a local file. If the file is not found locally, it is searched for in the accompanying image data folder, for example
street.pnga URL, for example
https://petercorke.com/files/images/monalisa.png
MVTB tool#
An interactive IPython session with the MVTB toolbox, NumPy and Matplotlib already imported. Compared to the regular Python REPL it has the advantage of command history, tab completion, and inline help. For example:
$ mvtbtool
_  _ ____ ____ _  _ _ _  _ ____    _  _ _ ____ _ ____ _  _
|\/| |__| |    |__| | |\ | |___    |  | | [__  | |  | |\ |
|  | |  | |___ |  | | | \| |___     \/  | ___] | |__| | \|

___ ____ ____ _    ___  ____ _  _
|  |  | |  | |    |__] |  |  \/
|  |__| |__| |___ |__] |__| _/\_

for Python

You're running: MVTB==0.9.7, SMTB==1.1.13, NumPy==1.26.4, SciPy==1.14.1,
                                Matplotlib==3.10.0, OpenCV==4.10.0, Open3D==0.18.0
 .
 .
 .
>>> im = Image.Read("monalisa.png")
>>> im.disp()
Out[2]: <matplotlib.image.AxesImage at 0x1690e9720>
Images can also be loaded by listing them as command-line arguments, either as a filename or a URL:
$ mvtbtool street.png
and the images appear in the IPython session as img which is an instance, or a list
of instances, of Image objects, in the order
they are listed on the command line. For example:
$ mvtbtool street.png https://petercorke.com/files/images/monalisa.png
A script can be run at startup using the --run option. For example:
img.disp()
then we can run the script at startup with an image file by:
$ mvtbtool street.png --run=myscript.py
and the result is a display of the image in an interactive Matplotlib window and the IPython session is left open for further experimentation.
IPython has many configuration options and mechanisms including command-line arguments,
configuration files and startup scripts. mvtbtool’s command-line arguments are processed before IPython’s command-line options.
$ mvtbtool --help
usage: mvtbtool [-h] [-r RUN] [-B BACKEND] [-t THEME] [-x] [-P PROMPT] [-a]
                [-R RESULTPREFIX] [--reload] [-b] [--torch]
                [images ...]

Machine Vision Toolbox shell

positional arguments:
  images                images to load on startup. These appear in the variable img; or img[0], img[1],
                        ... if multiple are specified (default: None)

options:
  -h, --help            show this help message and exit
  -r RUN, --run RUN     script to run at startup, but not displayed. Same as IPython's builtin -i option
                        (default: None)
  -B BACKEND, --backend BACKEND
                        specify BACKEND as the Matplotlib graphics backend (e.g. 'TkAgg', 'Qt5Agg',
                        'WebAgg', etc). By default, the backend is chosen automatically by Matplotlib.
                        (default: None)
  -t THEME, --theme THEME
                        specify terminal color theme (neutral, lightbg, nocolor, linux), linux is for
                        dark mode (default: neutral)
  -x, --confirmexit     confirm exit (default: False)
  -P PROMPT, --prompt PROMPT
                        input prompt string (default: >>> )
  -a, --showassign      automatically display the result of assignments, use ';' to suppress output
                        (default: False)
  -R RESULTPREFIX, --resultprefix RESULTPREFIX
                        execution result prefix, include {} for execution count number (default: None)
  --reload              enable autoreload of any imported modules, same as IPython's builtin %autoreload
                        2 (default: False)
  -b, --base            'from machinevisiontoolbox.base import *', otherwise it is an alias 'mvb'.
                        (default: False)
  --torch               import torch and torchvision if installed (default: False)

options can be set via the environment variable MVTB_OPTIONS, for example:

    $ export MVTB_OPTIONS="--backend TkAgg --prompt 'mvtb> ' --reload --torch --showassign"
Image tool#
imtool is a command-line tool that opens a window for each of the images specified
on the command line. For example:
$ imtool street.png https://petercorke.com/files/images/monalisa.png
Essentially, it is just another image browser, but images are displayed using idisp
which has a number of useful features such as the ability to zoom, pan and scroll the
image, as well as display the coordinate and pixel value at the cursor position.
Left-click and drag the mouse to define a rectangular region of interest (ROI). After releasing the mouse button, the rectangle displays drag handles in the centre of each edge which allows for resizing the rectangle. Various key presses perform operations on the rectangle:
‘p’ key will pop the rectangle out as a new window.
‘h’ key will display a pixel frequency histogram.
‘c’ key will display a cumulative pixel frequency histogram.
‘?’ will display help text.
Shift-left-click and drag will draw a line. After releasing the mouse button, a plot of pixel intensity values along the line will be displayed.
The pixel values are, by default, displayed in the color space of the image, but the
--colorspace option can be used to specify a different color space for display. For
example:
$ imtool street.png --colorspace=Lab
will display the image in its original color space, but the pixel values under the cursor will be displayed in the Lab color space.
The pick option allows the user to click on the image and select a series of coordinates. For example:
$ imtool street.png --points
Each selected point is indicated by a red cross and the coordinates of the point are printed to the terminal. Left-click adds a new point, right-click removes the last added point, and Enter means end of picking and the coordinates of the selected points are printed to the terminal. The coordinates are in pixel units, with the origin at the top left corner of the image:
$ imtool street.png --points
   u       v       Δu      Δv      |Δ|
146.6   91.1
302.7   136.2   156.1    45.2    162.5
301.4   645.9   -1.3     509.7   509.7
142.7   682.0   -158.7   36.1    162.8
You can zoom in using the magnifier button at bottom of the window to achieve more accurate picking.
Warning
It is important to select the window (click the title bar) before clicking on the image, otherwise the first click will just select the window and not be.
$ imtool --help
usage: imtool [-h] [--colorspace COLORSPACE] [--block] [--metadata] [--points]
              [--csv] [--grid] [--verbose] [--backend BACKEND] [--alpha]
              files [files ...]

Display an image using Machine Vision Toolbox for Python.

positional arguments:
  files                 list of image files to view, files can also include
                        those distributed with machinevision toolbox, eg.
                        'monalisa.png'

options:
  -h, --help            show this help message and exit
  --colorspace COLORSPACE, -c COLORSPACE
                        colorspace to display pixel value in (default RGB)
                        (default: None)
  --block, -b           block after each image (default: False)
  --metadata, -m        Print image metadata to stdout (default: False)
  --points, -p          Pick points (default: False)
  --csv                 Output picked points as CSV to stdout (default: False)
  --grid, -g            Overlay grid on images (default: False)
  --verbose, -v         Show image details (default: False)
  --backend BACKEND, -B BACKEND
                        Matplotlib backend to use, e.g. TkAgg, Qt5Agg, MacOSX
                        (default: system default) (default: None)
  --alpha, -a           Read and display the alpha channel if present
                        (default: strip alpha) (default: False)
Tag tool#
tagtool is a command-line tool that highlights the AR markers (ArUco or AprilTag) in
the specified image. For example:
$ tagtool lab-scene.png
tag IDs: 0, 1, 2, 3, 4, 5
The tool prints the tag IDs to the terminal, and displays the image with the tags highlighted.
If we know the camera intrinsics we can also estimate the pose of the tags and display the coordinate frames of the tags in the image. For example:
$ tagtool -f=3045 -p=2016,1512 -s=0.067 --axes lab-scene.png --camera=lab-camera.json
where the tag side length is 67mm, the camera focal length is 3045 pixels, and the principal point is at (2016, 1512) pixels. If the focal length is known in metres, then the –rho option must be used to specify the pixel pitch in metres per pixel, for example:
$ tagtool -f=0.004 -p=2016,1512 --rho=0.000001 -s=0.067 --axes lab-scene.png
So long as you are consistent about units you can have focal length in mm and pixel pitch in mm/pixel.

$ tagtool --help
usage: tagtool [-h] [-d DICT] [-s SIDE] [-f FOCALLENGTH] [-p PRINCIPALPOINT]
               [-r RHO] [-b] [-a] [-j FILE] [--no-display] [--no-table]
               [--rmax RMAX] [-g] [-v]
               files [files ...]

Display AR tags in image using Machine Vision Toolbox for Python.AR tags are
highlighted with their IDs and the canonic top-left corner is marked.

positional arguments:
  files                 list of image files to view, files can also include
                        those distributed with machinevision toolbox, eg.
                        'lab-scene.png'

options:
  -h, --help            show this help message and exit
  -d DICT, --dict DICT  Aruco dictionary to use, default is 4x4_50
  -s SIDE, --side SIDE  Tag side length, default is 25
  -f FOCALLENGTH, --focallength FOCALLENGTH
                        Focal length in units of pixels or metres if rho is
                        specified: f | fu,fv. Required for tag pose estimation
                        (default: None)
  -p PRINCIPALPOINT, --principalpoint PRINCIPALPOINT
                        Principal point coordinate in units of pixels: pu,pv.
                        Required for tag pose estimation. If not specified use
                        image centre (default: None)
  -r RHO, --rho RHO     Pixel pitch in units of m/pixel, required for tag pose
                        estimation if focal length is specified in metres
                        (default: None)
  -b, --block           block after each image (default: False)
  -a, --axes            Show coordinate frames (default: False)
  -j FILE, --json FILE  Output tag data to JSON file (default: None)
  --no-display          Do not display images, just output JSON data (default:
                        False)
  --no-table            Do not display table of tag data (default: False)
  --rmax RMAX           Threshold for highlighting tags with large
                        reprojection error (in pixels) in red, 0 for no
                        highlighting (default: 0)
  -g, --grid            Overlay grid on images (default: False)
  -v, --verbose         Show image details (default: False)

A camera model is required to determine poses, this requires that focal length
is specified.
OCR tool#
ocrtool is a command-line tool that performs optical character recognition (OCR) on the specified image. For example:
$ ocrtool penguins.png -l
pytesseract is required for OCR functionality. Install it with: pip install pytesseract or pip install machinevision-toolbox-python[ocr]
Install the tesseract OCR engine from https://github.com/tesseract-ocr/tesseract?tab=readme-ov-file#installing-tesseract
Traceback (most recent call last):
  File "/opt/hostedtoolcache/Python/3.12.13/x64/bin/ocrtool", line 6, in <module>
    sys.exit(main())
             ^^^^^^
  File "/home/runner/work/machinevision-toolbox-python/machinevision-toolbox-python/src/machinevisiontoolbox/bin/ocrtool.py", line 116, in main
    f"# {file}: {len(words)} words; confidence: {c.min():.1f} - {c.max():.1f}%, mean {c.mean():.1f}%"
                                                 ^^^^^^^
  File "/opt/hostedtoolcache/Python/3.12.13/x64/lib/python3.12/site-packages/numpy/_core/_methods.py", line 45, in _amin
    return umr_minimum(a, axis, None, out, keepdims, initial, where)
           ^^^^^^^^^^^^^^^^^^^^^^^^^^^^^^^^^^^^^^^^^^^^^^^^^^^^^^^^^
ValueError: zero-size array to reduction operation minimum which has no identity
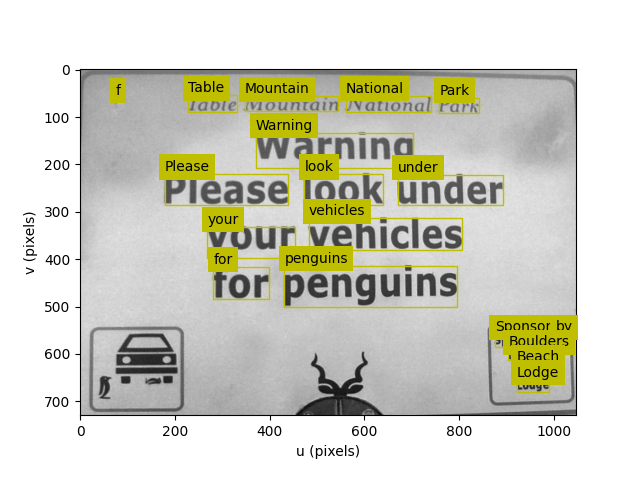
The tool uses Tesseract OCR to identify words in the image and their bounding boxes. The results are printed to the terminal as a table of word, confidence, left, top, right, bottom, width and height. The bounding box is shown in the image if the --view option is specified. For example:
$ ocrtool penguins.png --view
$ ocrtool --help
usage: ocrtool [-h] [-L | -D] [-c CONFIDENCE] [-l] [-j FILE] [-v] [-b] [-g]
               files [files ...]

Display text words found in image using Machine Vision Toolbox for Python.
Words are written to stdout or a JSON file, but can also be highlighted in the
image.

positional arguments:
  files                 list of image files to view, files can also include
                        those distributed with machinevision toolbox, eg.
                        '.png'

options:
  -h, --help            show this help message and exit
  -L, --lightbg         Look for light background with dark text (default)
                        (default: False)
  -D, --darkbg          Look for dark background with light text (default:
                        False)
  -c CONFIDENCE, --confidence CONFIDENCE
                        Minimum confidence for OCR text to be displayed (%)
                        (default: 50.0)
  -l, --long            Long listing (include bounding box coordinates and
                        confidence in output) (default: False)
  -j FILE, --json FILE  Output results in JSON format to FILE: word,
                        confidence, LTRB bounding box coordinates, and
                        dimensions (default: None)
  -v, --view            Overlay recognised word boxes on image (default:
                        False)
  -b, --block           block after each image (default: False)
  -g, --grid            Show grid (default: False)
ROS bag tool#
bagtool is a command-line tool that reads images and point clouds from a ROS bag file and displays
them. To scope out what’s in the bag file, the tool can print a table of the topics in
the bag file, the message type of each topic, the number of messages on each topic, and
whether the topic is allowed (according to the message and topic filters applied, see --message and --topic) to be displayed. For example:
$ wget https://download.ifi.uzh.ch/rpg/drone_racing_data/race_1.bag # download from UZH FPV Racing Dataset (570MB)
$ bagtool race_1.bag
ROSBag('bags/race_1.bag')
recorded on 2022-06-07T05:34:11.367+10:00, duration 00:00:28, 12213 messages
┌────────────────────────────┬───────────────────────┬───────┐
│           topic            │        msgtype        │ count │
├────────────────────────────┼───────────────────────┼───────┤
│ /camera/fisheye2/image_raw │ sensor_msgs/msg/Image │   855 │
│ /camera/odom/sample        │ nav_msgs/msg/Odometry │  5679 │
│ /camera/imu                │ sensor_msgs/msg/Imu   │  5679 │
└────────────────────────────┴───────────────────────┴───────┘
We can see that the bag contains many images (messages type sensor_msgs/msg/Image), and we can display them as an animation:
$ bagtool -m Image --animate race_1.bag
where the message filter -m Image is used to specify the messages that contain Image.
A filter is simply a substring that must be present in the message type for the topic to be allowed.
Various keystrokes can be used to pause/resume the animation, and change the playback speed. Note that in this particular bag file the rotors don’t
start spinning until around frame 60, and takeoff is at around frame 270. If we omit -m Image then the tool will
fail when it encounters a non-image message.
Alternatively, the tool can display one frame at a time, with keystrokes to jump forward in various step sizes:
$ bagtool -m Image --view race_1.bag
The image is displayed using disp and has the ability to zoom and pan the image as well as display pixel values under the cursor. The current
topic is displayed in the title bar of the window.
Left-click and drag the mouse to define a rectangular region of interest (ROI). After releasing the mouse button, the rectangle displays drag handles in the centre of each edge which allows for resizing the rectangle. Various key presses perform operations on the rectangle:
‘p’ key will pop the rectangle out as a new window.
‘h’ key will display a pixel frequency histogram.
‘c’ key will display a cumulative pixel frequency histogram.
‘?’ will display help text.
Shift-left-click and drag will draw a line. After releasing the mouse button, a plot of pixel intensity values along the line will be displayed.
If multiple topics contain images, select the one to display using the --topic option which specifies a substring that must be present in the topic name:
$ bagtool -m Image --view --topic=fisheye2 race_1.bag
The tool goes to some effort to convert the ROS sensor_msgs/msg/Image message into the correct pixel data type and
color order. NaNs within floating point images are displayed as red.
Point clouds (uncolored and colored) can also be displayed or animated. For example, using the CSIRO forest dataset:
$ bagtool --message PointCloud2 --animate forestI.bag
Note
If a bag file is given as a URL it will be downloaded and cached locally in a temporary file. If the --keep option is given it will be saved in the current directory.
Some sources of ROS bag files include:
CSIRO Forest Dataset, then Files/forestI/forestI.bag
$ bagtool --help
usage: bagtool [-h] [-i | -p] [-t FILTER] [-m FILTER] [-v] [-l] [-b] [-a] [-g]
               [--colororder COLORORDER] [--dtype DTYPE] [-k] [--no-progress]
               [--release RELEASE] [--debug]
               files [files ...]

Display images or pointclouds from a ROS bag file using Machine Vision Toolbox
for Python.

positional arguments:
  files                 list of ROS bag files to view.  URLs (http:// or
                        https://) are also supported and will be downloaded
                        before viewing, see --keep option below.

options:
  -h, --help            show this help message and exit
  -i, --image           only display image messages (Image / CompressedImage),
                        same as --msgfilter=Image (default: False)
  -p, --pointcloud      only display point cloud messages (PointCloud2), same
                        as --msgfilter=PointCloud2 (default: False)
  -t FILTER, --topic FILTER
                        Only display messages from topics containing FILTER
                        (default: None)
  -m FILTER, --message FILTER
                        Only display messages of type containing FILTER
                        (default: None)
  -v, --view            Display images in bag file (default: False)
  -l, --list            List topics in bag file (default: False)
  -b, --block           block after each image (default: False)
  -a, --animate         Animate images in bag file (default: False)
  -g, --grid            Overlay grid on images (default: False)
  --colororder COLORORDER
                        Override the default color order for the image
                        messages (default: None)
  --dtype DTYPE         Override the default data type for the image messages
                        (default: None)
  -k, --keep            when a file argument is a URL, save the downloaded bag
                        in the current directory (default: False)
  --no-progress         disable the tqdm progress bar when scanning bag
                        metadata (default: False)
  --release RELEASE     ROS release name used to parse the bag, e.g.
                        'melodic', 'noetic', 'humble'; 'auto' tries all known
                        ROS 1 releases (default: auto)
  --debug               print diagnostic information about topic/message
                        filtering and ROS release auto-detection (default:
                        False)